You know that feeling when you need to figure out how to create pins on Pinterest, and the whole process just takes forever? I used to struggle with that too.
I’d sit down to make 6-10 pins, schedule them for the next couple of days, and feel pretty good about myself. Then, a few days later, you realize you have nothing scheduled and the whole cycle starts again.
That’s exactly what happened to me for months. I was using an AI Pinterest prompt to write my pin text, but it was still such a pain. I’d have to copy and paste the prompt, scroll through to find all the parts where I needed to add my information, fill everything in, and then do it all over again for the next pin.
Maybe you’re dealing with the same frustration right now. You procrastinate, skip days, and Pinterest starts feeling like a chore rather than something that actually helps your business.
I finally admitted I needed a completely different approach. So I built a GPT that lets me create 2 weeks of Pinterest content (70 pins) in one sitting, and now I actually look forward to batching my pins instead of dreading it. You can do the same thing.
This post includes affiliate links to products I love and recommend, meaning I may receive a small commission at no extra cost to you. Please read full disclosure for more information.
Step 1: I Do The Keyword Research First
Before you create anything, you need to know what people are actually searching for. This is the part that makes or breaks your whole Pinterest strategy, and most creators either skip it or guess.
Here’s what I do, and you can follow the same process. I start with the blog post I want to promote, and then I research what keywords will actually get my pins in front of the right people.
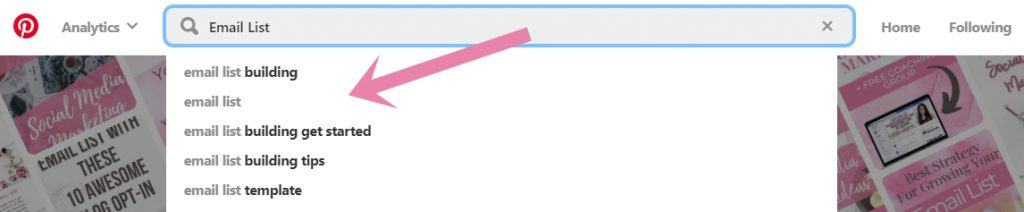
I type a few ideas into the Pinterest search box and watch what suggestions come up in the drop-down menu. Pinterest shows you real searches that people are typing in right now, so you’re not just making stuff up.
You can learn more about keyword research from my other post: The Ultimate Guide to Finding Pinterest Keywords That Boost Your Visibility.
Then I open Pin Inspector. This tool is freaking awesome because it shows you how many people search for each keyword every month.
I pick one main keyword and 2-4 supporting ones that make sense together.
For example, if your main keyword is “create pins on Pinterest,” your supporting keywords might be “Pinterest pin ideas,” “pin design tips,” or “Pinterest content strategy.” They all relate to each other, and Pinterest understands what your content is about.
This step takes maybe 10-15 minutes, and it saves you from wasting time on pins that nobody will find. You want to create content that people are actively searching for, not content that sits there getting zero views.
If you would like to learn more about Pin Inspector, then check out my blog post: The Pinterest Keyword Tool That Blew My Mind (And Why You’ll Love It Too)
Step 2: I Write Pin Titles and Descriptions Fast With Pinny
This used to be the part that killed me, and it’s probably the part you hate most, too. You sit there trying to write pin titles and descriptions that sound natural but also have the right keywords. You rewrite the same sentence 10 times because you’re worried it sounds too spammy.
I get it. I spent hours doing that, and it made me want to quit Pinterest completely. Now I use Pinny SEO Pro, and this part takes 5 minutes instead of hours. You’re going to love this part because it takes all the mental work out of writing. Here’s how it works:
- I open Pinny and click the button START. It asks 8 questions, and I give it the information it needs. I tell it where I’m pinning to, who I’m trying to reach, and what the goal is. Then I give it my main keyword and those 2-4 supporting ones I found earlier.
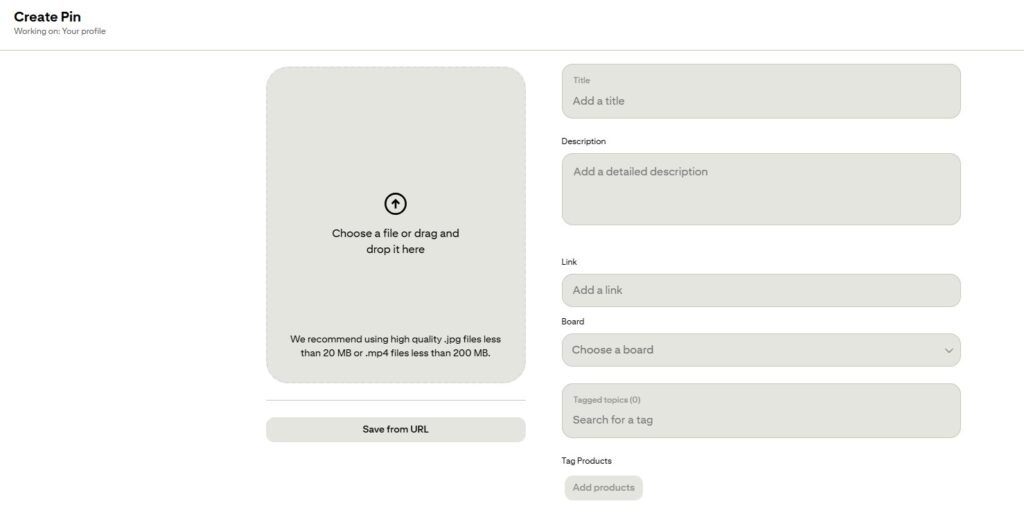
- Then Pinny takes all of that and gives me 7 different versions for one URL. So I get pin image titles, pin titles, pin descriptions, and even AI image prompts I can use later. The text sounds like a real person wrote it, and there’s no keyword stuffing.
- I copy everything into my Pinterest planner, and I’m done.

What used to take me hours now happens while I’m drinking my yummy hot coffee. Pinny is still creating pins for one URL at a time, but now you have 7 versions ready to test for the next 7 weeks, and you didn’t have to write a single word yourself.
When I first started using this, I couldn’t believe how much time it saved me. You’ll probably feel the same way the first time you try it. And also the second time…and maybe even the third time hehe.
Step 3: I Create My Pin Images
Once I have my text ready, I need the actual pin images. I use two tools for this: Ideogram and NightCafe. Both of them let you create professional-looking pins without hiring a designer or spending an hour in Canva (except if you want to).
Here’s the thing: you shouldn’t just make one image per blog post. You make multiple designs because you have to test what works. Maybe one pin has a bold title overlaid on the image, and another one has a cleaner look. You want to see which style gets more clicks from your audience.
Pinny already gave you AI image prompts when it wrote your pin text, so you can use those as a starting point. You might tweak them a bit to match your brand colors or style, and then you let the AI tools do their thing.
This part takes longer than writing the text, but it’s still way faster than doing it in Canva. You can create 7-10 pin images in about 10 minutes, depending on how picky you’re being that day. And because you’re testing different visuals, you’ll start to see patterns in what your audience actually clicks on.
Step 4: I Schedule Everything at Once
Now comes the part that changed everything for me, and it’ll change everything for you, too. Instead of scheduling a few pins and calling it a day, you schedule 14 days of content in one sitting.
I open my Pinterest planner and Pinterest’s native scheduler. The scheduler is free, but keep in mind, you can only schedule up to 100 pins.
I schedule 5 pins per day. But here’s the important part: each pin goes to a different blog post URL.
Pinterest really hates it when you share the same link multiple times per week. I’ve heard stories in Facebook groups about people getting their accounts flagged or even shut down because they did that. So I only use each URL once per week, just to be safe. You should do the same thing.
When you’re scheduling, make sure each pin goes to the most relevant board. That helps Pinterest figure out faster what your pin is about, and it means your content gets shown to the right people sooner.
Once you’re done scheduling, you have two full weeks of Pinterest content ready to go. Can you imagine how good it feels to know you don’t have to worry about Pinterest for two whole weeks? That’s the feeling I get every time I finish batching.
What Changed After I Started Using Pinny
Before I built this GPT, I was lucky to schedule 4-6 days of pins at a time. You probably know that feeling, where Pinterest takes up so much mental energy that you just don’t want to deal with it anymore.
Now I sit down once every two weeks, and I create 70 pins that are getting me between 25,000 and 30,000+ people to my blog every month. You can get similar results if you follow this same system.
What Actually Matters After You Schedule
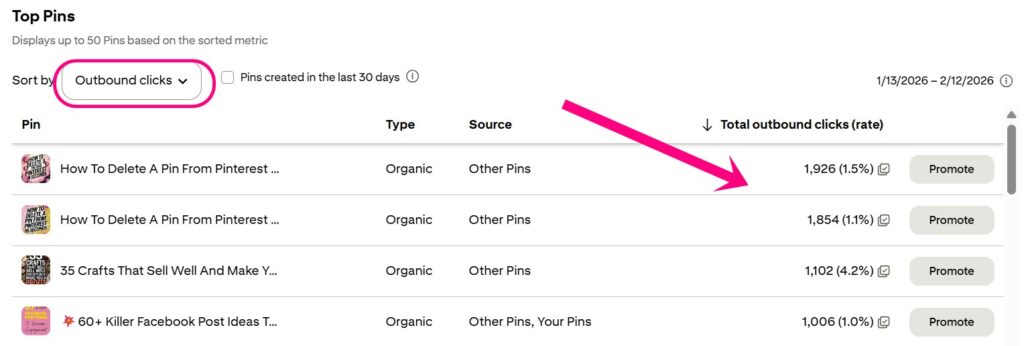
Once your pins are scheduled, you need to know what to track. I check outbound clicks first because that’s the number that actually matters. Outbound clicks tell you if people are going to your site, which is the whole point of Pinterest.
I also look at engagement stats, but I don’t obsess over them. And maybe you’re wondering, “But Petra, what about impressions?” I don’t care much about them. You can get a million impressions, but if nobody’s clicking through to your site, those impressions aren’t doing anything for you.
So if you notice that pins with a certain style or title format are getting more clicks, you make more of those, just don’t make the same ones. Pinterest wants fresh pins, which means the design should always look different.
Why This Works Better Than What You’re Doing Now
The reason this GPT saves so much time is because you’re not reinventing the wheel every single day. You do your keyword research once, you batch your writing, you batch your image creation, and you batch your scheduling. Everything happens in one focused session instead of being spread out over weeks.
But the only way you’ll really see results is if you’re consistent. Pinterest rewards that. The algorithm shows your content to more people because you’re proving you’re a reliable and active creator.
So if you’re tired of doing it the hard way, grab Pinny today and start saving 10+ hours every week.
Final Thoughts On How to Create Pins on Pinterest
Look, I know Pinterest can feel like a lot. But once you stop doing everything manually and start batching your work, it stops being this thing you dread.
You do your keyword research once, you write all your text at the same time, you create your images in one session, and then you schedule two weeks of content. That’s it. You’re not reinventing the wheel every couple of days anymore.
You’re not procrastinating because the hard part is already done. If you follow this exact system, you’ll save 10+ hours every week and actually start seeing consistent traffic from Pinterest. And that’s when Pinterest finally starts working for your business instead of against it.
Here are a few more blog posts you’ll love:
- The Pinterest Keyword Tool That Blew My Mind (And Why You’ll Love It Too)
- The Ultimate Guide to Finding Pinterest Keywords That Boost Your Visibility
- How to Make Money on Pinterest for Beginners
- 30-Day Pinterest Challenge To Increase Traffic To Your Digital Business
- Want to Make $100 Per Day on Pinterest? Try These Easy Strategies